
The 25 designer kitchen photos in this collection showcase the full spectrum of luxury kitchen design in 2026, from minimalist Scandinavian sanctuaries to maximalist Mediterranean estates, curated to help you identify specific styles, finishes, and layouts that resonate with your vision and budget.
Whether you’re planning a full renovation or refreshing your existing space, these images aren’t just eye candy. Each photo has been selected because it demonstrates smart design choices you can actually implement, from the high-end versions that define each trend to budget-conscious alternatives that capture the same aesthetic impact for thousands less.
What separates inspiring kitchen photos from useful ones? The difference lies in understanding what makes each design work. You’ll see how professional designers layer textures, balance proportions, and create focal points that make even compact kitchens feel magazine-worthy. More importantly, you’ll learn which elements deliver the biggest visual return on investment, so you can prioritize where to splurge and where to save.
This guide breaks down today’s most sought-after kitchen styles into distinct categories, making it simple to pinpoint your aesthetic preferences and understand the signature elements that define each look. From the materials and color palettes to the lighting and hardware that complete the vision, you’ll walk away with a clear roadmap for translating inspiration into reality. No interior designer required.
What Makes a Kitchen Photo ‘Designer-Worthy’
Not every beautiful kitchen qualifies as truly designer-worthy. The difference lies in intentional choices that create visual harmony while solving real-world problems. The 25 kitchens featured in this collection passed a rigorous evaluation based on five essential elements that separate inspiring spaces from merely functional ones.
Thoughtful Layout and Flow
Designer kitchens demonstrate smart spatial planning that makes cooking and gathering effortless. The work triangle (sink, stove, refrigerator) functions smoothly without wasted steps, while zones for prep, cooking, and cleanup remain distinct yet connected. Traffic patterns allow multiple people to move through the space without collisions. You’ll notice these kitchens never sacrifice usability for aesthetics, the prettiest backsplash means nothing if you can’t reach your most-used ingredients.
Color Harmony and Material Cohesion
Each selected kitchen shows restraint with its palette, typically limiting itself to three to five coordinating colors and materials. Whether warm wood tones play against cool marble or bold cabinet colors anchor a neutral backdrop, the combinations feel purposeful rather than chaotic. Finishes complement each other, matte black fixtures with brushed brass accents, or glossy subway tiles paired with honed countertops. This cohesion creates a polished look that photographs beautifully and lives even better.
Strategic Lighting Design
Great kitchen lighting layers multiple sources to eliminate shadows and create ambiance. These spaces combine bright task lighting over work surfaces, ambient fixtures for overall illumination, and accent lighting that highlights architectural features or display areas. Natural light gets maximized through thoughtful window placement or reflective surfaces that bounce daylight deeper into the room.
A Memorable Focal Point
Every designer kitchen in this collection features at least one element that commands attention, a dramatic range hood, an unexpected tile pattern, a statement island, or a show-stopping light fixture. This focal point gives the space personality and creates that “wow” moment while remaining functional rather than purely decorative.
The Function-Beauty Balance
The ultimate test: these kitchens work as hard as they look good. Storage solutions hide clutter without feeling cramped, surfaces withstand daily use, and beautiful elements serve practical purposes. A gorgeous open shelf displays dishes you actually use. That stunning marble island includes prep space and seating. This marriage of form and function separates true design excellence from spaces that merely photograph well.
25 Designer Kitchen Photos That Will Transform Your Vision
Modern Minimalist Kitchens
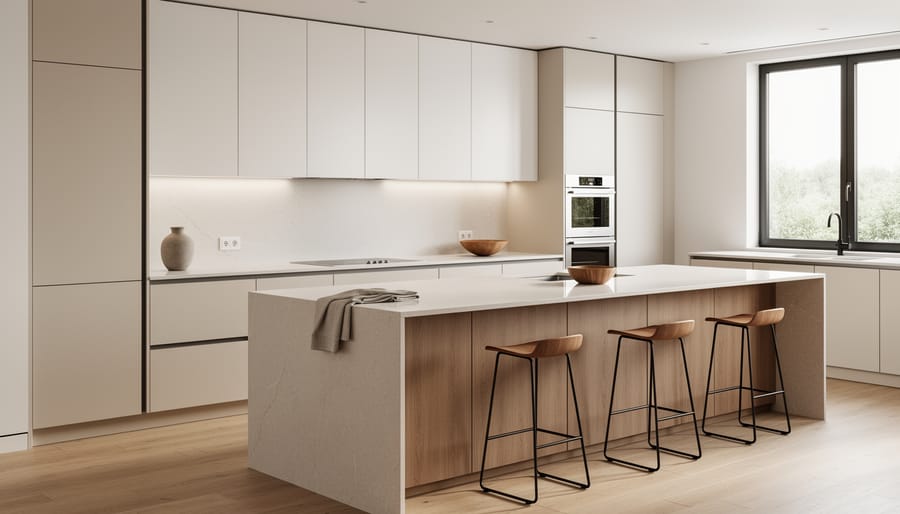
Photo 1: The All-White Sanctuary
Floor-to-ceiling white lacquered cabinets disappear into white walls, creating a seamless canvas where stainless steel appliances become sculptural elements. The absence of hardware keeps surfaces uninterrupted, while a single marble-look quartz waterfall island anchors the space. A hidden pantry behind a flush door panel proves that minimalism doesn’t sacrifice storage.
*Budget tip:* Skip custom handleless cabinets and add discreet edge pulls to IKEA flat-panel doors, then paint everything one color for a cohesive look at a fraction of the cost.
Photo 2: Concrete and Walnut Warmth
This kitchen pairs cool concrete-effect countertops with warm walnut upper cabinets that float against a pale gray wall. Open lower shelving displays just three ceramic pieces, demonstrating the “less is more” principle. Under-cabinet lighting creates subtle drama without cluttering the visual field.
*Key takeaway:* Minimalism works best when you limit material choices to two or three complementary elements and repeat them throughout the space.
Photo 3: The Monochrome Gallery
Charcoal gray cabinets stretch in clean horizontal lines, interrupted only by a slim stainless backsplash that reflects light without pattern or texture. A single pendant light drops over the island like a piece of modern sculpture. Every appliance sits flush with cabinetry, maintaining the unbroken geometry.
*Budget tip:* Panel your refrigerator and dishwasher with matching cabinet fronts from your existing line rather than buying integrated appliances, saving thousands while achieving the built-in aesthetic.
Photo 4: Natural Light Amplified
Large windows flood this white and blonde wood kitchen with daylight, eliminating the need for decorative lighting. The L-shaped layout keeps pathways clear, while shallow open shelving on one wall holds daily-use items within reach. A pale terrazzo backsplash adds subtle texture without visual noise.
*Key takeaway:* Minimalist kitchens rely on excellent lighting and thoughtful layout rather than decorative elements to create interest.
Photo 5: The Black Statement
Matte black cabinets prove minimalism doesn’t require white. The bold choice works because every other element stays neutral: white counters, pale oak floors, and a single green plant. Push-to-open drawers eliminate hardware entirely, while integrated appliances maintain clean lines.
*Budget tip:* Use stick-on matte vinyl wrap to transform existing cabinets to black instead of replacing them, testing the dramatic look before committing to a permanent change.
Warm and Inviting Traditional Spaces
Traditional kitchen design never goes out of style because it creates spaces that feel like the heart of a home. These five kitchens prove that classic doesn’t mean outdated, they blend the warmth of heritage design with the conveniences we expect in 2026.
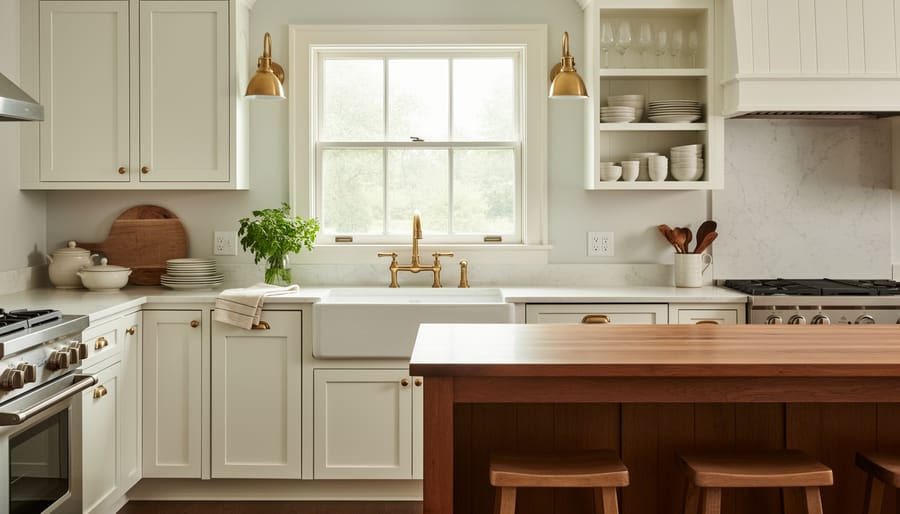
Photo 6: Shaker-Style Kitchen with Vintage Hardware
This kitchen features creamy white Shaker cabinets paired with oil-rubbed bronze hardware that adds character without feeling fussy. The deep farmhouse sink anchors the design, while open shelving displays everyday dishes that double as decor. Notice how the wood countertops on the island create a natural contrast against painted perimeter cabinets, a budget-friendly way to introduce warmth without refinishing everything.
Key takeaway: Update existing Shaker cabinets by swapping out generic pulls for vintage-inspired hardware. It costs under $200 and transforms the entire look.
Photo 7: Warm Wood Tones Meet White Marble
Rich walnut cabinetry grounds this kitchen, preventing the white marble countertops and subway tile backsplash from feeling cold. The designer balanced dark wood with ample natural light from oversized windows and added under-cabinet lighting to keep work surfaces bright. A butcher block cutting board and copper cookware provide lived-in warmth.
Budget alternative: Skip full marble countertops and use marble only on the backsplash, pairing it with butcher block or quartz counters that mimic marble’s veining.
Photo 8: Two-Tone Traditional with Glass-Front Cabinets
Navy lower cabinets meet sage green uppers in this kitchen that respects traditional proportions while embracing color. Glass-front cabinets on the upper level break up solid cabinetry and create display opportunities. The polished nickel faucet and pendant lights reference classic design without looking like reproductions.
Key takeaway: Painting upper and lower cabinets different colors adds visual interest while keeping installation and materials traditional.
Photo 9: Brick Backsplash and Reclaimed Wood Beams
Exposed brick behind the range creates an instant focal point in this kitchen, while reclaimed wood ceiling beams add architectural interest overhead. The designer kept cabinets simple in painted white to let these textural elements shine. Brass accents throughout tie the warm tones together.
Budget hack: Use brick veneer panels instead of individual bricks for a similar look at a fraction of the cost and installation time.
Photo 10: Classic White with Professional Touches
This all-white traditional kitchen incorporates modern functionality through a commercial-style range and pot filler faucet. The designers added crown molding and furniture-style island legs to maintain classic elegance while upgrading appliances to restaurant-quality performance. Marble hexagon floor tiles nod to vintage style.
Key takeaway: Professional appliances fit beautifully in traditional kitchens when surrounded by classic details that soften their industrial edges.
Bold and Colorful Statement Kitchens
Color transforms a kitchen from merely functional to genuinely memorable. These five designer kitchens prove that embracing bold hues doesn’t mean sacrificing sophistication, it’s all about strategic placement and confident execution.
Photo 11: Emerald Green Island with Brass Accents
This kitchen anchors the space with a deep emerald island while keeping perimeter cabinets in warm white. The brass hardware and fixtures amplify the jewel-tone cabinetry without competing for attention. The ceiling-height white subway tile backsplash provides breathing room, preventing the green from feeling heavy.
Budget-friendly approach: Paint just your lower cabinets or island in a rich color while leaving uppers neutral. This creates visual interest for under $200 in quality paint, compared to thousands for new cabinetry.
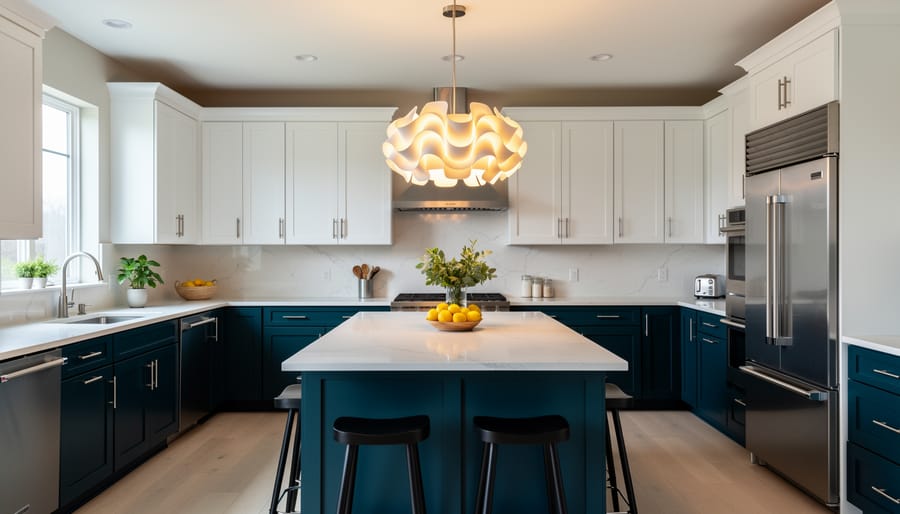
Photo 12: Navy Blue Full-Height Cabinets with Gold Hardware
Floor-to-ceiling navy cabinets make a powerful statement in this galley kitchen. The designer balanced the drama with white marble countertops and open shelving that breaks up the wall of color. Warm wood floors prevent the space from reading too cool.
Key takeaway: Dark colors work beautifully in kitchens with excellent natural light or thoughtfully layered artificial lighting. Add under-cabinet LED strips to prevent shadows in your prep areas.
Photo 13: Terracotta Backsplash with Neutral Cabinetry
Here, the color lives entirely in a floor-to-ceiling terracotta zellige tile backsplash. The handmade tiles catch light differently throughout the day, creating depth and movement against simple white shaker cabinets. Black countertops ground the warm tones.
This approach lets you experiment with color in a reversible way, tiles can be changed more easily than cabinetry if your taste evolves.
Photo 14: Two-Tone Kitchen with Sage Green Lowers
Soft sage green lower cabinets paired with natural wood uppers create an organic, grounded feeling. The designer chose matte black fixtures and a white quartz countertop to bridge the two tones. Open shelving displays cream-colored dishes that echo the neutral upper cabinets.
The two-tone strategy works particularly well in open-plan spaces where you want the kitchen to feel distinct without walls separating it.
Photo 15: Coral Pink Island in an Otherwise White Kitchen
A single coral pink island becomes the room’s focal point in this predominantly white space. The unexpected hue feels fresh rather than overwhelming because it’s confined to one element. White oak flooring and brushed nickel hardware keep the overall palette balanced and sophisticated.
Start small: If full cabinet color feels risky, paint just the interior of glass-front cabinets or add a colorful range hood as your statement piece.
Luxury Kitchen Details Worth Stealing
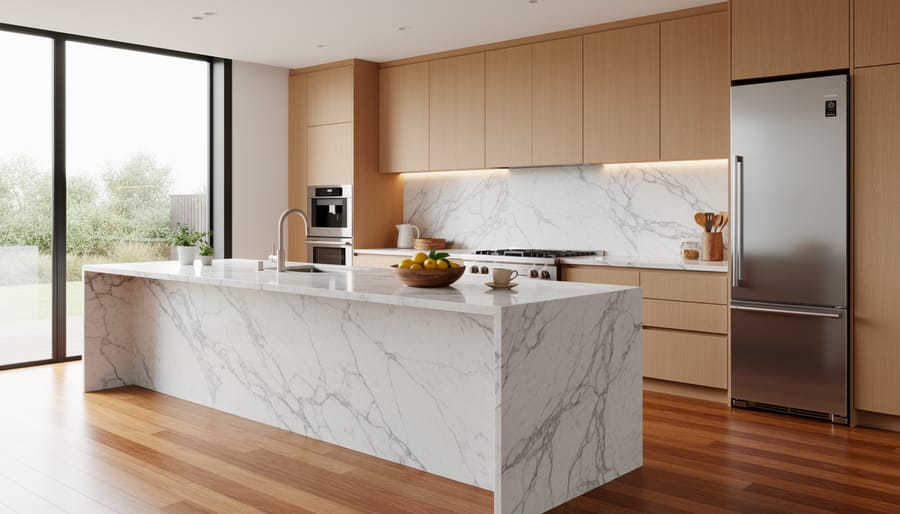
Photo 16: Calacatta Marble Waterfall Island
This kitchen centers on a stunning Calacatta marble island with a waterfall edge that cascades to the floor on both ends. The dramatic veining creates a focal point that anchors the entire space. While genuine Calacatta can cost $180-$250 per square foot installed, you can achieve a similar impact with porcelain slabs that mimic marble for $50-$80 per square foot. The visual effect remains impressive, and the porcelain actually outperforms natural marble in durability and stain resistance.
Photo 17: Professional-Grade Range and Hood
A commercial-style 48-inch range paired with a custom bronze range hood dominates this kitchen’s cooking wall. The brass accents and hand-hammered detailing make it a true centerpiece. If a $15,000 La Cornue range isn’t in your budget, consider a Bertazzoni or Hallman range in the $2,500-$4,000 range. Paint your existing hood in a metallic finish or add brass trim strips to create that custom look for under $300.
Photo 18: Floor-to-Ceiling Cabinetry with Glass Inserts
This photo showcases custom cabinetry that extends to a 10-foot ceiling, with textured glass upper cabinets that display curated dishware while hiding clutter. The key is the vertical drama. You can replicate this by adding crown molding and a second row of cabinets above standard uppers. IKEA’s Sektion system allows you to stack cabinets affordably, and you can retrofit standard cabinet doors with reeded glass panels for $40-$60 each.
Photo 19: Integrated Appliance Wall
Everything from the refrigerator to the coffee maker hides behind matching cabinet panels in this seamless design. The built-in look costs significantly more, but you can fake it with appliance panel kits. Companies like GE and Bosch offer panel-ready dishwashers starting around $800, and refrigerator panel kits run $200-$400, giving you that custom appearance at a fraction of the cost.
Photo 20: Statement Lighting Cluster
Three oversized hand-blown glass pendants hang at varying heights above this island, creating sculptural interest. Rather than spending $3,000 on designer fixtures, mix affordable pendants at different drop lengths. The layered effect matters more than the price tag.
Small Space Kitchen Solutions
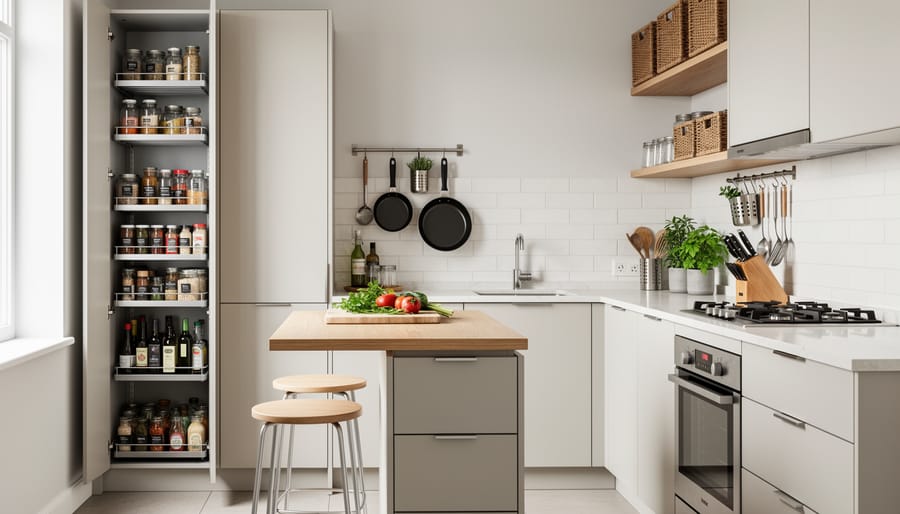
Photo 21: The Galley Kitchen That Defies Its Dimensions
This narrow galley kitchen proves that limited square footage doesn’t mean limited style. Floor-to-ceiling white cabinetry creates an unbroken vertical line that draws the eye upward, making the 7-foot-wide space feel significantly taller. Open shelving on one side prevents the corridor from feeling tunnel-like while displaying everyday dishes within arm’s reach. The real genius lies in the custom pull-out pantry hidden beside the refrigerator, a slim 12-inch cabinet that stores spices, oils, and canned goods that would otherwise clutter countertops.
Budget win: Paint existing cabinets white and remove a few upper cabinet doors to create the open-shelf effect for under $200.
Photo 22: The Corner Kitchen That Embraces Angles
Instead of fighting an awkward corner layout, this 85-square-foot kitchen leans into it with a diagonal sink placement that creates surprisingly generous counter space on both sides. Mirrored backsplash tiles reflect light and visually double the room’s depth. Under-cabinet lighting eliminates shadows that typically make small kitchens feel cramped. The compact dishwasher drawer tucked beneath the counter handles daily loads without the footprint of a full-size unit.
Key takeaway: Strategic lighting can add perceived square footage more effectively than any renovation.
Photo 23: The Studio Kitchen With Hidden Superpowers
This kitchenette designed for a 400-square-foot studio apartment features a stunning pocket door system that conceals the entire cooking zone when not in use. Inside, magnetic knife strips, hanging pot racks, and a fold-down cutting board attached to the cabinet door maximize every surface. The two-burner induction cooktop takes up half the space of traditional ranges while the drawer-style microwave fits seamlessly into cabinetry.
Photo 24: The L-Shaped Layout That Works Overtime
Spanning just 9 feet on each wall, this L-shaped kitchen incorporates a peninsula that serves triple duty as prep surface, dining spot for two, and visual barrier from the living area. Shallow upper cabinets (10 inches instead of the standard 12) prevent head-bumping while still offering storage. The integrated appliance panel on the refrigerator creates a streamlined look that makes the space feel intentionally compact rather than squeezed.
Photo 25: The One-Wall Wonder With Surprising Capacity
This single-wall kitchen stretches 12 feet and houses a full-size refrigerator, range, sink, and dishwasher without feeling cluttered. The secret is the floor-to-ceiling storage tower at one end that consolidates pantry items, small appliances, and cleaning supplies in one streamlined column. Floating shelves above the countertop replace bulky cabinets, and the light wood finish reflects natural window light throughout the day.
How to Use These Photos for Your Own Kitchen Project
Flipping through gorgeous kitchen photos is easy. Turning that inspiration into your actual space? That takes a bit more strategy, but it’s completely doable.
Start by saving photos that make you stop scrolling. Don’t overthink it, if a kitchen image gives you that “I want to live here” feeling, save it. After you’ve collected 15-20 favorites, look for patterns. Are you drawn to white cabinets or dark moody tones? Open shelving or sleek closed storage? Warm wood or cool metallics? These patterns reveal your true style preferences, which might surprise you.
Next, assess your actual space honestly. A sprawling kitchen with a massive island won’t translate to a galley setup, but the color scheme or lighting approach might. Look past the square footage in your inspiration photos and focus on adaptable elements like cabinet color, hardware style, backsplash patterns, or the way natural light is maximized.
Create a simple mood board, digital or physical, grouping your favorite photos by the specific elements you love. Maybe five photos showcase perfect subway tile, three highlight beautiful brass fixtures, and four nail the exact shade of blue you want for your lower cabinets. This visual organization makes it easier to communicate your vision to contractors or sales staff at home improvement stores.
Here’s how to move from dreaming to doing:
- Prioritize which elements matter most to you and tackle those first
- Get three quotes from contractors for major work like cabinet installation or layout changes
- Identify which tasks you can DIY, like painting cabinets, installing new hardware, or adding peel-and-stick backsplash
- Set a realistic budget with 15-20% cushion for unexpected costs
- Create a timeline that accounts for material lead times and contractor availability
- Shop around for materials, the same marble look comes in natural stone, quartz, and laminate at very different price points
- Document your current kitchen with photos so you can track progress and make before-after comparisons
Budget smart by mixing investment pieces with saves. Splurge on elements you’ll touch daily, like quality faucets and durable countertops. Save on things like cabinet boxes (paint can transform builder-grade doors) and decorative items you can swap out later. A phased approach works too, install new counters this year, upgrade appliances next year when your current ones need replacing anyway.
Common Questions About Designer Kitchen Design
You’ve spent time scrolling through these designer kitchen photos, and now the practical questions start bubbling up. Can you actually pull this off? What’s realistic for your budget and timeline? Here’s what homeowners ask most often when they’re ready to move from inspiration to implementation.
Can I achieve a designer look on a modest budget?
Absolutely. Focus on high-impact changes like painting cabinets, upgrading hardware, and improving lighting, these three moves transform a kitchen for under $2,000. Save splurges for one or two focal points like a statement backsplash or a quality faucet, and use budget materials elsewhere.
How long does a typical kitchen renovation take?
Minor refreshes (paint, hardware, lighting) take 1-2 weeks. Mid-level renovations with new countertops and backsplashes run 4-6 weeks. Full gut renovations typically need 8-12 weeks, though supply chain issues and permit delays can extend timelines.
Which elements should I DIY versus hire out?
DIY works well for painting cabinets, installing hardware, peel-and-stick backsplashes, and basic organization systems. Always hire licensed professionals for electrical work, gas line adjustments, plumbing relocations, and structural changes, mistakes here cost far more than the labor savings.
How do I adapt luxury features for a real-world budget?
Look for the design principle behind the luxury element. That marble island? Try a quartz that mimics marble for half the price. Custom cabinets? Semi-custom lines offer similar looks at 40% less. Professional-grade appliances? Consumer models in stainless with commercial styling deliver the aesthetic without the $15,000 price tag.
What’s the biggest mistake people make when using designer photos as inspiration?
Trying to replicate everything exactly instead of extracting the design DNA. A photo might inspire you with its blue cabinets, but your space might need a different shade or just blue accents to work properly. Take the concept, not the carbon copy.
Should I follow current trends or choose timeless design?
Build your foundation with timeless elements, classic cabinet styles, neutral backgrounds, quality materials, then layer in trends through easily changeable details like paint colors, light fixtures, and accessories. This approach keeps your kitchen feeling fresh without requiring a complete overhaul every five years.
The key to successfully translating designer kitchen photos into your own space lies in understanding your constraints upfront. Be honest about your budget, timeline, and skill level before you start tearing things apart. A phased approach often works best, tackle the painting and hardware this month, save for countertops over the next six months, then address the backsplash. This staged strategy keeps you from living in construction chaos for months while spreading costs across your budget cycles.
Remember that those stunning designer photos typically represent significant investments of both money and professional expertise. That doesn’t mean you can’t get there, but it does mean setting realistic expectations. Your version might take longer to complete or require creative substitutions, and that’s perfectly fine. The goal isn’t perfection, it’s creating a kitchen that functions beautifully for your life while reflecting the design principles that spoke to you in those inspiring photos.
items
Modern Scandinavian Kitchen with Oak Accents
This light-filled space combines white shaker cabinets with warm oak floating shelves and a matching wood countertop on the island. The mix of materials prevents the white palette from feeling sterile while maintaining that signature Nordic simplicity.
Deep Green Cabinetry with Brass Hardware
Hunter green lower cabinets paired with white uppers create visual interest without overwhelming the space. The brass fixtures and cabinet pulls add warmth and elevate the look beyond basic painted cabinets.
Industrial Loft Kitchen with Exposed Brick
Original brick walls anchor this open kitchen featuring stainless steel appliances and black metal shelving. The raw materials give character while keeping the design surprisingly clean and functional.
Coastal White Kitchen with Natural Textures
All-white cabinetry gets depth from a chunky butcher block island, rattan pendant lights, and open shelving displaying natural pottery. The layered neutrals create a relaxed, beachy vibe without nautical clichés.
Important Note
When browsing through these designer kitchen photos, remember that inspiration doesn’t require duplication. You’re not trying to recreate these spaces exactly as shown. Instead, you’re identifying specific elements that resonate with your style and could work in your home. Maybe it’s the way natural light highlights open shelving in one photo, or how a bold backsplash adds personality in another.
The most successful kitchen projects start with clear priorities. Rather than attempting a complete overhaul, many homeowners achieve dramatic results by focusing on one or two standout features from their favorite photos. This focused approach keeps budgets manageable and prevents the paralysis that comes from trying to incorporate too many ideas at once. A single well-executed element, like statement lighting or a carefully chosen paint color, often makes more impact than multiple half-finished upgrades.
Looking through these 25 designer kitchen photos, you’ve probably noticed something powerful: the right visual inspiration can completely shift how you see your own space. What once seemed impossible or out of reach suddenly feels doable when you break it down into specific elements you love.
The beauty of using photos as your design compass is that you’re not locked into recreating an entire kitchen wholesale. Maybe you’re drawn to the marble backsplash in photo 16 but love the open shelving from photo 8. Perhaps the navy island in photo 13 speaks to you, while the brass fixtures in photo 19 add that finishing touch you’ve been missing. Mix and match what resonates.
Start small if a full renovation isn’t in the cards right now. Swap out cabinet hardware, paint an accent wall, or install peel-and-stick tile for an instant refresh. These baby steps build momentum and help you refine your vision without the pressure of a complete overhaul.
Remember, every designer kitchen you’ve admired started with someone’s vision and a willingness to take that first step. Whether you’re working with a modest budget or planning a luxury transformation, the principles remain the same: thoughtful choices, attention to detail, and staying true to what makes you feel at home.
Your dream kitchen is closer than you think. Armed with these photos and ideas, you’re already on your way.